目录
背景说明
日常生活中,经常会有一些可以改进工作效率的![]() 小点子
小点子![]() 在脑海中闪现。
在脑海中闪现。
这些想法往往非常简单,在原理上是很好实现的;而苦于不懂前端,只能停留在Idea的阶段,或者仅仅写个后端逻辑。
为此,我需要把自己打造成一名“入门级全栈工程师”(在各个技术方面上只要入个门,具备快速产品原型的能力就好了)
最近一直在听网易前端微专业的课程,
不愧是网易自家的课程,讲得确实很到位(够清楚、简洁)![]()
可惜前些天连着长假,没怎么听课;之前的课件中遇到练习部分或者课件的源码阅读部分,只要能理解原理的,也基本都跳过了。
其实,能看懂和自己能写还是有很大差距的;自己写起来“捉鸡”就说明没有彻底整明白,或者还不熟练。
昨天听到 《DOM编程艺术》 > 实践篇 > 组件实践 (郑海波主讲)的时候,感觉明显有点跟不上了; 于是决定参考课件里的源码,自己再彻底地梳理一遍;顺便把基础知识也复习了。
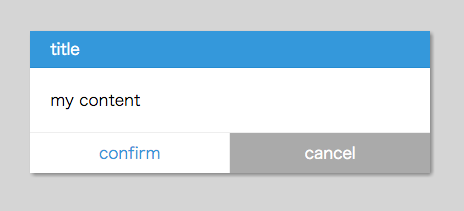
这节课的练习内容是:实现一个模态弹窗控件,要求封装良好&扩展性强。
 点击按钮后弹窗,50%灰度遮罩;暴露以下接口:
- 窗体的标题和内容(并提供默认值)
- 弹出和收回动画
- 确认/取消等事件
实现静态结构
Talk is cheap. Show me the code.1
— Torvalds, Linus (2000-08-25)
直接上代码
HTML
要实现的结构如图
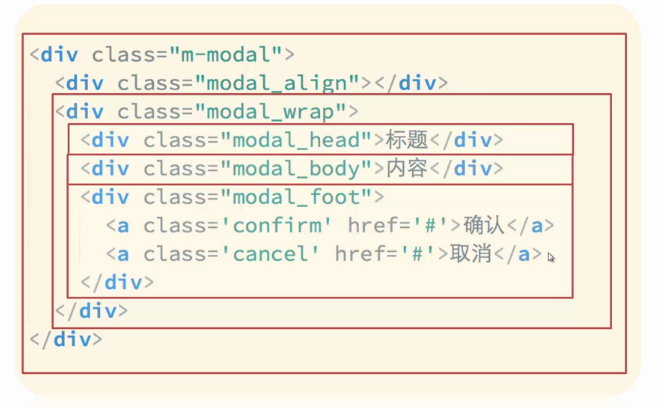
m-modal包裹住整个控件,大小为整个视窗(稍后见CSS)modal-align是用于对齐的辅助元素;这里用了一个非常偏的trick来实现水平垂直居中modal-wrap就是对窗体的包裹了
<div class="m-modal">
	<div class="modal-align"></div>
	<!-- 不要写自闭合的<div />,Chrome不认 -->
	<!-- 后面用到了`animate.css`框架,所以不要忘记加上"animated"类,否则动画效果看不到-->
	<div class="modal-wrap animated">
		<div class="modal-head"></div>
		<div class="modal-body"></div>
		<div class="modal-foot">
			<a href="#" class="confirm">confirm</a>
			<!-- 这两个<a>之间换行了,在HTML里面会呈现为一个空格的内容;
			所以,如果采用display:inline-block方式来实现的话,就要注意这个空格
			但是,如果用了float,元素会自动强制渲染为块级元素,不受影响 -->
			<a href="#" class="cancel">cancel</a>
		</div>
	</div>
</div>
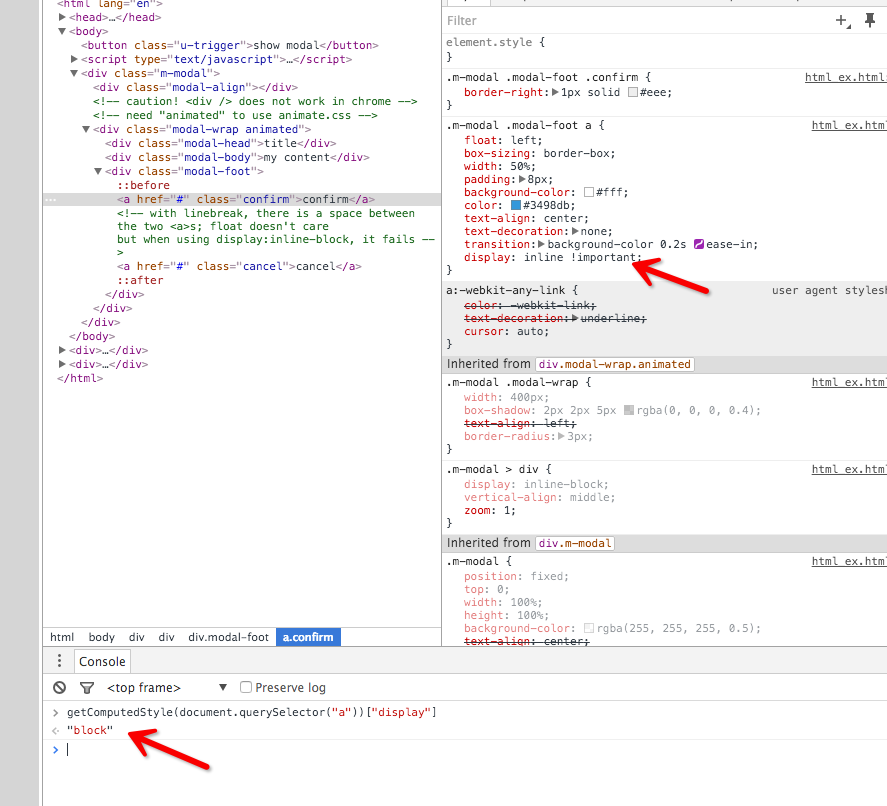
只要是应用了float样式的元素,不论其类型如何,也不论css怎么写;
都会被自动且强制地渲染为block元素,即使写!important也没用2
CSS
<head>
    <meta charset="utf-8" />

	<!-- <link rel="stylesheet" type="text/css" href="https://raw.github.com/daneden/animate.css/master/animate.css" /> -->
	<!-- 不要直接引用GitHub上的文件,否则可能遇到"304 File Not Changed" 或者拿到空文件;或者拿到 MIME 为 "text/plain"的文件。而Chrome只认 "text/css" ,建议下载到本地再引用。-->
	<link rel="stylesheet" href="animate.css">

	<style type="text/css">
	/*下面是Modal控件相关的样式*/
	body, html {
		margin: 0;
		padding: 0;
	}

	body {
		background-color: #aaa;
	}

	.m-modal {
		position: fixed; // fixed元素脱离文档流;所以,即使modal在<body>中,<body>的尺寸也不会被撑起来
		left: 0;
		top: 0;
		width: 100%;
		height: 100%;
		background-color: rgba(255, 255, 255, 0.5);
		text-align: center; //水平居中
	}

	.m-modal > div { //把辅助元素和主wrapper都设置成垂直居中
		display: inline-block;
		vertical-align: middle;
		zoom: 1; //这个仅仅用来激活硬件渲染
	}

	.m-modal .modal-align { //用一个100%高度的辅助元素来帮助居中对齐
		height: 100%;
		line-height: 100%;
		width: 1px;
	}

	.m-modal .modal-wrap {
		width: 400px;
		box-shadow: 2px 2px 5px rgba(0, 0, 0, 0.4);
		text-align: left;
		border-radius: 3px;
	}

	.m-modal .modal-head {
		background-color: #3498db;
		color: #fff;
		border-bottom: 1px solid #258cd1;
		line-height: 1.5em;
		padding: 6px 20px;
	}

	.m-modal .modal-body {
		background-color: #fff;
		padding: 20px;
	}

	.m-modal .modal-foot {
		border-top: 1px solid #eee;
	}

	/*这里貌似跟float有关*/
	.m-modal .modal-foot:before,
	.m-modal .modal-foot:after {
		display: table;
		line-height: 0;
		content: "";
	}

	.m-modal .modal-foot:after {
		clear: both;
	}

	.m-modal .modal-foot a {
		float: left;
		box-sizing: border-box;
		width: 50%;
		padding: 8px;
		background-color: #fff;
		color: #3498db;
		text-align: center;
		text-decoration: none;
		transition: background-color 0.2s ease-in;
	}

	.m-modal .modal-foot a:hover {
		background-color: #71b7e6;
		color: #fff;
	}

	.m-modal .modal-foot a:active { // `:active`就是按下后的状态;比hover设置更深一点的颜色
		background-color: #3498db;
		color: #fff;
	}

	.m-modal .modal-foot .confirm {
		border-right: 1px solid #eee;
	}

	.m-modal .modal-foot .cancel { //确认和取消按钮的颜色不同,有点儿“iPhone上窗体按钮一个蓝色一个白色”的意思
		color: #999;
	}

	.m-modal .modal-foot .cancel:hover {
		background-color: #aaa;
	}

	/*下面的内容跟 “show modal”按钮有关*/
	/*注意,有时候双斜杠注释会抽风;把下面的一行也注释掉*/
	.u-trigger {
		display: block;
		width: 120px;
		height: 32px;
		font-size: 16px;
		margin: 60px auto;
	}
	</style>
</head>
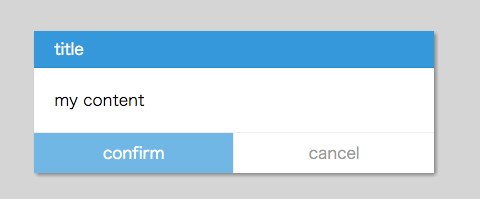
鼠标经过确认按钮,变浅蓝色;经过取消按钮,变灰色
定义接口
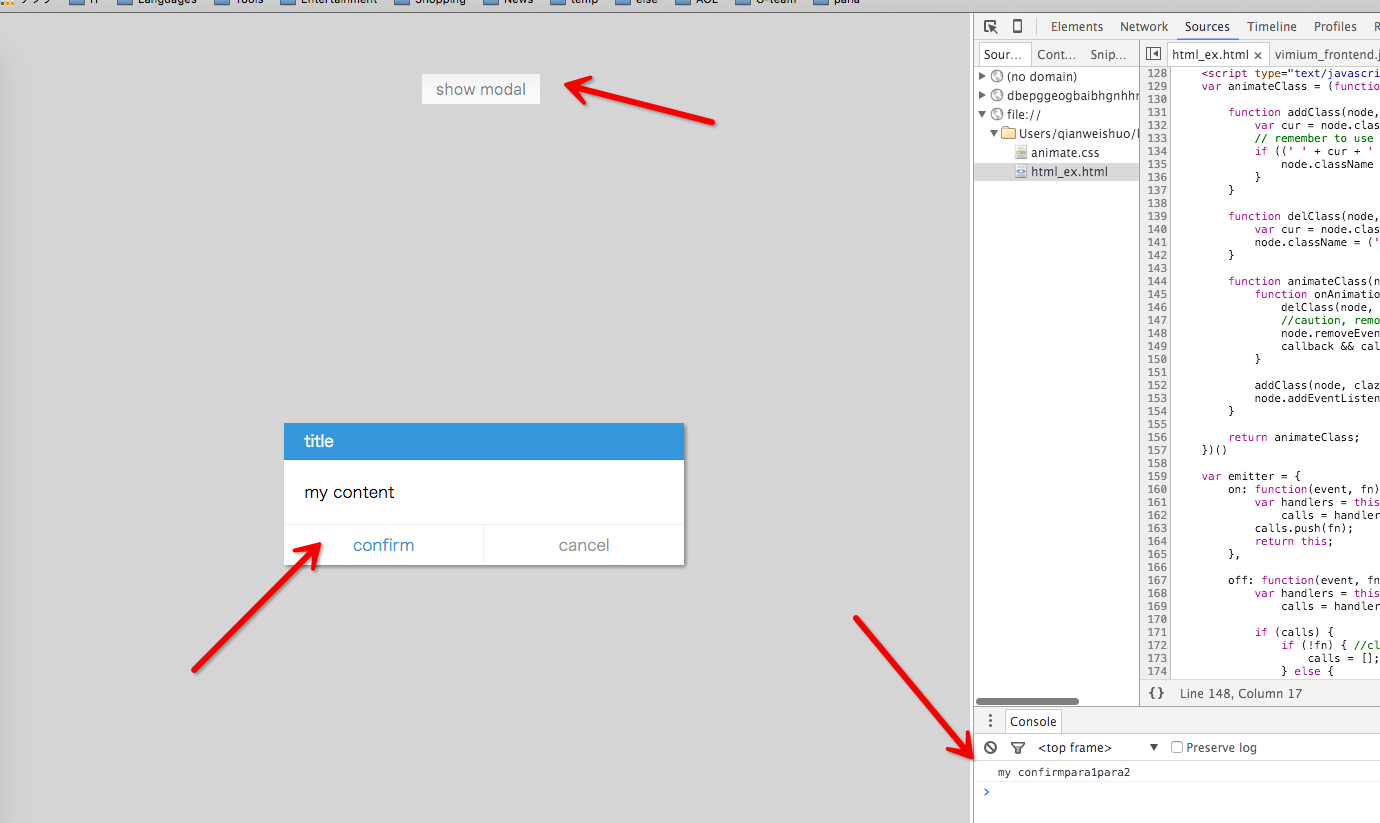
封装完好的Modal控件,应该是这样用的:
- 基于类的接口
- 可以传入标题/内容(HTML格式)和动画(animate.css支持的),也提供默认值
- 使用事件发射器,方便扩展
- 支持事件传参
- 支持
show()和hide()方法
var modal = new Modal({
	// title: "my title",
	content: "<h1>my content</h1>",
	animation: {
		enter: "bounceIn",
		leave: "bounceOut"
	}
})

modal.on("confirm", function(a, b) {
	console.log("my confirm" + a + b);
})

modal.on("cancel", function() {
	console.log("my cancel");
})

document.querySelector(".u-trigger").addEventListener("click", function() {
	modal.show();
})
实现接口
后面在Modal的实现中会用到一些工具函数,简要梳理一下:
| 函数原型 | 功能 |
|---|---|
html2node(str) |
根据str生成DOM元素并返回 |
extent(o1,o2) |
实现“混入”(Mixin)模式;把o2的属性混入到o1中,已有的属性不覆盖 |
animateClass(node,clazz,callback) |
对node节点应用一遍名为clazz的动画(来自animate.css),动画结束后执行回调函数 |
emitter |
这个其实不是函数,是一个发射器对象;提供最简单的事件绑定/解绑/触发功能 |
DOM辅助函数html2node & 混入辅助函数extend
这里用一个匿名函数把代码包起来(闭包的写法)是为了封装;
在关于Modal的内容中把Modal构造函数return出来即可供外部调用;
而其它的辅助函数在全局scope中则不可见。
! function() {
	function html2node(str) { //把HTML字符串转成DOM元素
		var container = document.createElement("div");
		container.innerHTML = str; // 注意,Chrome还提供一个小写的"innerHtml()" 接口;但是不好用
		return container.children[0];
	}

	function extend(o1, o2) { //“混入”(Mixin)模式;把o2的属性混入到o1中,不覆盖
		for (var prop in o2) {
			if (o1[prop] === undefined) {
				o1[prop] = o2[prop];
			}
		}
		return o1; // 类似这样的返回,都只是为了方便链式调用;下略
	}

	// ... 关于Modal的内容
}();
动画辅助函数animateClass
Keep it simple, stupid3
— a design principle noted by the U.S. Navy in 1960
根据大名鼎鼎的KISS原则,下面仅实现一个相当简易的、完全不考虑浏览器兼容性的事件发射器。
类似地,下面也用了闭包;隐藏了addClass和delClass函数
var animateClass = (function() {
	function addClass(node, clazz) {
		var cur = node.className || "";
		if ((' ' + cur + ' ').indexOf(' ' + clazz + ' ') === -1) { // 记得在.indexOf前面用括号
			node.className = cur ? (cur + ' ' + clazz) : clazz;
		}
	}

	function delClass(node, clazz) {
		var cur = node.className || "";
		node.className = (' ' + cur + ' ').replace(' ' + clazz + ' ', '').trim();
	}

	return function(node, clazz, callback) {
		addClass(node, clazz);
		node.addEventListener("animationend", function() {
			delClass(node, clazz);
			// 记得移除“动画结束”事件监听器,否则后面会多次重入。
			// 注意removeEventListener的第一个参数不要漏写了
			node.removeEventListener('animationend', arguments.callee);
			callback && callback();
		});
	}
})()
简易的发射器对象emitter
这里没有用闭包,直接暴露emitter对象。
另外,用到splice4来做删除。
var emitter = {
	on: function(event, fn) { //对this上的event事件绑定一个监听函数fn
		var handlers = this._handlers || (this._handlers = {}), //注意这里的奇技淫巧,||运算的右边顺便就做了赋值
			calls = handlers[event] || (handlers[event] = []);
		calls.push(fn); //这里没有做重复检查,直接push了。因此,多次绑定可重入。
		return this;
	},

	off: function(event, fn) { //对this上的event事件,从其监听函数列表中移除fn
		var handlers = this._handlers || {},
			calls = handlers[event];

		if (calls) { //只有当对应的监听列表存在时,才有必要处理
			if (!fn) { //不指定解绑的函数对象时,移除所有监听函数,清空整个监听列表
				calls = [];
			} else { //否则从监听列表中找到待解绑的函数,移除之
				for (var i = 0; i <= calls.length - 1; ++i) {
					if (calls[i] === fn) {
						calls.splice(i, 1); // list.splice(startIndex,howMany,newItem1,newItem2,...)
						return this;
					}
				}
			}
		}
		return this;
	},

	emit: function(event) {
		var args = [].slice.call(arguments, 1), //注意这里的call技巧
			handlers = this._handlers,
			calls = null;

		if (!handlers || !(calls = handlers[event])) return this; //如果没有监听列表,直接返回
		for (var i = 0; i <= calls.length - 1; ++i) { //否则逐个调用监听函数,带参数
			calls[i].apply(this, args);
		}
		return this;
	}
}
Modal
OK,重点来了;下面是Modal的实现
注意,这里也用了闭包;最后几行是把Modal类API给暴露出去
// ... 关于动画辅助函数`animateClass`和事件发射器`emitter`的定义
! function() {
	// ... 关于 `html2node` `extend` 的定义

	var template =
		'<div class="m-modal">\ //注意行末转义的反斜杠
	<div class="modal-align"></div>\
	<div class="modal-wrap animated">\
		<div class="modal-head"></div>\
		<div class="modal-body"></div>\
		<div class="modal-foot">\
			<a href="#" class="confirm">confirm</a>\
			<a href="#" class="cancel">cancel</a>\
		</div>\
	</div>\
</div>';

	function Modal(options) {
		// 把常用的DOM对象提取到对象属性里,免得频繁query
		this.container = this._layout.cloneNode(true); //注意这个true,指定深拷贝;不可少
		this.wrapper = this.container.querySelector(".modal-wrap");
		this.body = this.container.querySelector(".modal-body");

		extend(this, options); //把options直接混入对象,简单粗暴有效
		this.setContent(this.content);
		this.setTitle(this.title);
		this._initEvents();
	}

	extend(Modal.prototype, { // 对原型做混入,相当于给类添加行为
		_layout: html2node(template), //函数在各个对象间复用没问题,但是属性最好不要;所以上面用了cloneNode做深拷贝到每个对象

		// show的时候先加元素,再做动画;hide的时候先做动画,再移除元素
		show: function(content) {
			if (content) this.setContent(content);
			document.body.appendChild(this.container);
			animateClass(this.wrapper, this.animation.enter);
		},

		hide: function() {
			var that = this;
			animateClass(this.wrapper, this.animation.leave, function() {
				// 注意在回调函数中要慎用this;
				// 因为this指向的值取决于运行时这段代码所在的scope,即调用栈
				// 可以用闭包的方式,把this存到that变量里
				document.body.removeChild(that.container);
			})
		},

		setTitle: function(title) {
			// 这里提供了默认值;更好的实现方式应该是把默认值放到模板中
			this.wrapper.querySelector(".modal-head").innerHTML = title || "title";
		},

		setContent: function(content) {
			this.body.innerHTML = content || "content";
		},

		_initEvents: function() { // 给按钮绑事件
			var that = this;
			this.wrapper.querySelector(".confirm").addEventListener('click', function() {
				that.emit("confirm", "para1", "para2");
				that.hide();
			})
			this.wrapper.querySelector(".cancel").addEventListener('click', function() {
				that.emit("cancel");
				that.hide();
			})
		}
	})

	extend(Modal.prototype, emitter); //给Modal类混入事件发射器

    // ----------------------------------------------------------------------
    // 暴露API:  Amd || Commonjs  || Global
    if (typeof exports === 'object') { // 支持commonjs
        module.exports = Modal;
    } else if (typeof define === 'function' && define.amd) { // 支持amd
        define(function() {
            return Modal
        });
    } else { // 直接暴露到全局
        window.Modal = Modal;
    }
}();
全部拼起来,走两步~ 
调用关系大概是这样子的:
<!DOCTYPE html>
<html lang="en">
<head>
    <meta charset="UTF-8">
    <title>Modal Demo</title>

	<!-- 各种辅助脚本和样式 -->
    <link rel="stylesheet" href="animate.css">
    <link rel="stylesheet" href="modal.css">
    <script src='animate.js'></script>
    <script src='modal.js'></script>

	<!-- 本页的样式 -->
    <style>
    body {
        background-color: #aaa;
    }
    .u-trigger {
        display: block;
        width: 120px;
        height: 32px;
        font-size: 16px;
        margin: 60px auto;
    }
    </style>
</head>
<body>
    <button class='u-trigger'>show modal</button>
    <script>
    var modal = new Modal({
        // 1. 内容配置
        // title: "my title",
        content: "my content",
        // 2. 动画设置
        animation: {
            enter: "bounceIn",
            leave: "bounceOut"
        }
    })

	// 3. 事件监听
    modal.on("confirm", function(a, b) {
        console.log("my confirm" + a + b);
    })
    modal.on("cancel", function() {
        console.log("my cancel");
    })

	// 4. 绑定按钮,激活弹窗
    document.querySelector('.u-trigger').addEventListener('click', function() {
        modal.show("<h3>弹窗内容</h3");
    })
    </script>
</body>

</html>
补充说明
- 与暴露
onConfirm/onCancel函数作为API的方式相比,混入事件发射器可以提供更大的灵活性- 调用者可以方便地扩展出更多事件
- 可以对同一个事件绑定多个监听函数,而且是有序的
- 混入发射器的做法符合观察者模式5,是公认的最佳实践
- 本文所实现的动画是基于外部的css库,叫
animate.css,详见 https://daneden.github.io/animate.css/
脚注
-
郑海波老师似乎很喜欢这句”Talk is cheap. Show me the code.”,引用于此 https://en.wikiquote.org/wiki/Linus_Torvalds#2000-04 ↩
-
float深入剖析 http://www.w3cplus.com/css/float.html ↩
-
“Keep it simple, stupid” https://en.wikipedia.org/wiki/KISS_principle#In_software_development ↩
-
arrayObject.splice(index,howmany,item1,.....,itemX)http://www.w3school.com.cn/jsref/jsref_splice.asp ↩ -
观察者模式 https://zh.wikipedia.org/wiki/%E8%A7%82%E5%AF%9F%E8%80%85%E6%A8%A1%E5%BC%8F ↩